Friday, May 29, 2009

Grillin & Chillin: Chicken Breasts with Balsamic Glaze


The last few weeks have been absolutely gorgeous here in Portland. In fact, I have developed quite a crush on the weather lately! I also have a little crush on this balsamic vinegar. Our friends Gavin & Julie over at The Haute Kitchen were generous enough to give us a bottle. Ever since, I have been trying to figure out ways to use this balsamic on anything & everything! ( If you want to know more about it, click here.) In the midst of trying to balance these two current infatuations, how might you ask do I show my affection? By cooking outside of course, grilling chicken and pairing that with a balsamic glaze. (Love is better when shared!)

Brining is a great method to use on meats that can often turn dry and tasteless after being cooked. The brining process lends itself well to cuts like pork chops and boneless, skinless chicken. These particular chicken breasts get a huge boost from a little overnight skinny dip in the brining liquid, which might seem a bit tedious, but isn’t at all, promise! You make the brine the night before and by the next evening your chicken is ready for the grill! Brining flavors the meat all the way through, the sugars and salt seep in through the whole piece of meat rather than just the top layer. After brining, there is really no need to add any extra seasoning, the chicken will be succulent and flavorful enough as is. The balsamic glaze is sweet, savory, and just a little bit sticky, giving the chicken that extra bit of oomph! This recipe can also be efficiently divided and conquered by one person grilling the chicken and the other person busying themselves with making the glaze.

Grilled Chicken Breasts with Balsamic Glaze
Serves 4

For the Brine:

3 Tablespoons kosher salt
3 Tablespoons packed brown sugar
6 Thyme sprigs
2 Garlic cloves, halved
¾ Teaspoons coarsely cracked black pepper
4 Cups water

Combine all ingredients in a saucepan over medium heat. Bring to a simmer, stirring to dissolve the salt and sugar. Remove from heat. Transfer to a container large enough to hold all the brine and chicken breasts. Let the brine cool completely add the chicken breasts and refrigerate over night. Make sure the chicken is completely submerged in the brine and nor floating or anything!

For the Chicken:
4 Boneless, skinless, chicken breasts

Remove chicken breasts from brine. Throw on a grill, either over medium low or low, depending on how hot your grill gets. Cook chicken breasts, about 8 to 10 minutes on each side. When chicken is done, add the chicken to the pan with the balsamic glaze, and cook on low, about 1 minute, turning the chicken in the sauce until coated.

For the Balsamic Glaze:

2 Tablespoons unsalted butter, divided
1 shallot, minced
2 Tablespoons balsamic vinegar
1 Tablespoon fresh sage, minced
1 Cup low sodium or light chicken stock

In a medium saucepan, over medium heat add 1 tablespoon of butter. When butter melts add the minced shallots, stirring until softened, about 2 minutes. Add the balsamic vinegar, bring to a boil, and let reduce by half, about a minute. Add the stock and sage, turning the heat to high and scraping up any browned bits with a wooden spoon. Reduce until sauce is a 1/3 cup, about 6-7 minutes. Remove from heat, adding the remaining butter and swirling until the butter melts. When chicken is done, add chicken to pan on low, about a minute. Make some sides and eat up!

Wednesday, May 27, 2009

Fish Tacos with Avocado & Tomato Salsa

I have decided this is going to be my shout out blog post . So please oblige me on these 3 shout outs. I am afterall, still sharing a recipe with you. The # 1 shout out is to my little cousin Aaron ( he is actually not so little anymore, but to me he will remain for all intensive purposes, my little cousin.) Aaron is serving over in Iraq right now. Thank you for the great job you are doing, we love you!! The #2 shout out is to 2 of my oldest friends, Liz & Kim who came up to visit this weekend. Thanks for coming and sharing your love for breakfast & beer! And finally my 3rd shout out is to my Aunt Wendy, who has to eat gluten free and often can not make the recipes I post. The following recipe however she can, so here is to you Wendy, cook this!

After a fun-filled but exhausting 3 day weekend, (Thank you Kim & Liz!) I am finally back into the cooking swing of things. I made these fish tacos tonight and they were really fresh, light , and tasty, basically the quintessential summer dinner. I used Rockfish (abundant in the PNW) but you could use Red Snapper, Cod, or even Catfish. You basically just want a light fish that won’t be too overpowering, that will absorb a lot of flavor, and stand up to broiling. This recipe is healthy & figure friendly, not to mention gluten-free (Wendy, make this!)

This recipe serves 4!

For the Salsa:

4 Plum/Roma tomatoes, chopped
1 Large Hass avocado, peeled & chopped
2 Tablespoons fresh lime juice
3 Tablespoons green onions, chopped
3 Tablespoons fresh cilantro, chopped
½ Jalapeno, minced with seeds.
Salt & pepper

Mix in medium bowl, season with salt and pepper. Let the flavors hang out and come together while you make the rest of the meal.


For the Fish:

1 Pound fish fillets, skinned & de-boned
2 Garlic cloves, minced
3 Tablespoons fresh lime juice
½ Jalapeno, minced with seeds
2 Cups thinly sliced leaf lettuce
¼ Cup pepper jack or Cotija cheese
6 -inch corn or flour totrtillas

Preheat oven to 350 degrees.

Place fish fillets in a single layer on a rimmed baking sheet. Season with salt & pepper. Mix garlic, lime juice, and jalapeno in a small bowl. Drizzle half the lime juice mixture over fish, reserving remainder. Let fish stand 15 minutes.


Meanwhile, wrap tortillas in aluminum foil and place in oven until heated through (about the 15 minutes). Remove tortillas, keeping them in foil until ready to serve. Preheat broiler. Broil fish until just opaque in center, about 6-8 minutes. Cut fish into 1 inch pieces. Top each tortilla with lettuce, fish, and some of the reserved lime juice mixture. Spoon salsa over and sprinkle with cheese. Enjoy!

This past weekend was Memorial Day Weekend, if you didn’t notice. We don’t just get a 3 day weekend at the beginning of summer so we can all barbeque and work on our tan. Men and women that have served and are serving our country as we speak, are the reason we celebrate this holiday, so please don’t forget that! Miss you Aaron! (Aaron is the Airman 3rd from the left, shaking hands.)

Thursday, May 21, 2009

Parmesan & Fresh Basil Cream Sauce


I recently bought these very rich smoked salmon raviolis by Monterey Pasta Company. The first time I had these, I made a simple pasta sauce out of olive oil and fresh basil but it just didn't pair well together, the smoked salmon was a little too strong for the basic olive oil dressing. The ravioli really needed a sauce that was equally rich and indulgent to balance out the flavors, so I decided to make an Alfredo type sauce for them. Typically I don't cook a lot with cream or make cream sauces, but after experimenting a little, I think this one came out just right; not too heavy and the basil adds a nice freshness. Next time I make this sauce I think I will toss it with some fettuccine and sauteed mushrooms or shrimp. Of course, I won't be making this sauce weekly, it is not exactly bathing suit season friendly!

This sauce makes enough for a pound of pasta. If you are using one of those 8 ounce fresh pasta packages, then just divide this recipe in half!

1 1/2 Cups Heavy Cream
2 Tablespoons Butter
1 Cup freshly grated Parmesan Reggiano cheese
4 Garlic cloves, minced
1 Shallot, minced
10 Fresh Basil leaves, chopped
1/8 Teaspoon white pepper*
1/4 Teaspoon Kosher salt

*White pepper adds a much more subtle flavor as a seasoning to cream based dishes and fish, such as salmon.

Melt butter in a medium/large saucepan over medium heat. Add minced garlic and shallots. Cook, until tender, about 4-5 minutes. Add cream, Parmesan, and basil, increase heat to high and bring to a slow boil, reducing the sauce, about 4 minutes. When sauce is at desired consistency reduce heat to medium and add white pepper and salt, cooking an additional 2 minutes. Serve over pasta! You will probably want to serve it with some garlic bread to mop up all the yummy sauce as well!

Tuesday, May 19, 2009

Summertime Stimulus Package: 2 Bargain Whites

* I did not take the above picture but I would have liked to *

I am really more of a red wine girl, never really liked whites, in fact, I was downright snobbish about it. When I went wine tasting I would skip the whites and go straight for the reds, either handing the whites off to my husband, or just bypassing them all together. When you think about this, how sad and just plain ridiculous is it that I missed out on all that free wine? Good thing I have become more open minded, and in the name of palette training, over the years I have really come to appreciate a decent white. I enjoy white wines that are crisp and smooth, bottles that are especially good on a warm day, or when you want a glass of wine but nothing heavy or too sweet. White wine is the perfect companion to an outdoor barbecue or a beach picnic and also makes an excellent mask for pretending that you are not really drinking before cocktail hour…ha ha….

Fetzer Pinot Grigio (2006) is from California and can be found for around $6.99 a bottle. This wine is crisp, with hints of apple and pear, but not in a pear juice Chardonnay kind of way. This wine pairs well with spicy foods such as Thai and also went well with strawberries!

In a previous post I mentioned that I had yet to try Colombia Crest Vineyard 10 White Wine (2007). Well now I have, and this wine is a fabulous find at about $5.99! a bottle. This wine is smooth, with hints of citrus and apple. The Vineyard 10 has great drinkability and doesn't need any food, just a comfy chair and a patio!

Saturday, May 16, 2009

"Take Me to a BBQ Salad": Lemon Penne with Tomatoes, Bell Pepper & Feta


Several years ago, I made a version of this pasta salad for a barbeque but I had since lost the recipe. With this weekend’s gorgeous weather I decided to try and recreate something similar to what I remembered. This salad turned out delicious and would be a great addition to any summertime picnic or get together, plus it keeps really well and makes for excellent leftovers! You also wouldn’t have to worry about it getting too warm, because there is no mayo involved. To elevate this pasta salad from a side dish to a meal, add some store bought rotisserie chicken. Let’s get real, during a hot summer day the last thing you probably feel like doing is turning on a hot oven.

Lemon Pasta Salad with Tomatoes, Red Pepper & Feta
Serves 4 as a meal, 8 as a side dish

For the dressing:
7 Tablespoons olive oil
2 Teaspoons finely grated lemon peel
3 Tablespoons whole grain mustard *I actually used whole grain mustard with garlic. If you don’t have whole grain mustard with garlic, then use 2 tablespoons whole grain mustard with 2 minced garlic cloves.
4 Tablespoons fresh lemon juice

For the Salad:
12 Ounces Penne pasta
2 Cups grape or cherry tomatoes halved
2 Red bell peppers, chopped
10 Ounces crumbled Feta cheese

Start a large pot of salted water to boil.

Whisk oil lemon juice, mustard, garlic, and lemon peel in a small bowl until emulsified. Season to taste with salt and pepper. Set aside.

Cook Penne pasta in boiling salted water until al dente, about 11 minutes. Drain pasta. In a colander, rinse pasta with cold water until cool to the touch. In a large bowl, toss pasta with tomatoes, bell pepper, and feta cheese. Pour dressing over and toss until well coated. Season to taste with salt and pepper.
* If you have it on hand, top with some chopped fresh thyme.
We might see a lot of rain during the other 3 seasons of the year, but the Portland summers can't be beat! Lovin' it!

Thursday, May 14, 2009

Side Dish Perk-Up: Green Beans with Lemon & Thyme


To tell you the truth, I have been in a weekday food rut. I blame this on the manic weather we have been having this May in the Northwest . Just when I get into my spring/early summer cooking groove a cold winds strikes up, the sky gets dark, and the rain starts pouring down, washing away my visions of dinner alfresco. The weekends have made it easier to be inspired, I have more time for one, and there always seems to be something going on or guests to cook for. Plus the local Farmers Markets to feed both literally and figuratively, my culinary soul. However it is mid-week and I have been struggling.....

Whenever I am experiencing a cooking block, I like to leaf through old food magazines or cookbooks hoping to get inspired. 99.9 % of the time it works. I found this recipe in a Bon Appetit from June 2007. This rendition of green beans helped make a boring meal of roasted chicken and red potatoes a little more jazzed up for Thursday night dinner. Sometimes it just takes a little twist on something to get you right back on track. For me that means thinking about what I am going to be making for dinner this weekend. I haven‘t quite decided yet, but the forecast says warm and sunny; so this much I know : dinner outside!
Green Beans with Lemon & Thyme
Serves 4

1 pound green beans (fresh & tender, skinny ones, Blue Lake if possible (Trader Joe‘s)
1 tablespoon butter
2 teaspoons chopped fresh thyme/lemon thyme
1 teaspoon finely grated lemon peel
Salt & pepper

Cook green beans in boiling salted water until crisp-tender, about 5 minutes. Drain. Rinse with cold water and pat dry. Melt butter in a large skillet over medium-high heat. Add thyme, lemon peel, and green beans. Season with salt and pepper. Toss until heated through, about 5 minutes.

Tuesday, May 12, 2009

Clam Dip Craving


I try hard not to eat junk food, much less feed my family junk food. I think I am pretty successful at keeping it out of the house, we don’t ever have packaged chips or sweets on hand, not even ice cream, and I finally got rid of the soda pop during Lent! I find it is far less tempting this way, out of sight, out of mind. (Don’t worry I am not about to go into some health food spiel right now!) My point is, despite these efforts to keep my family junk food-free (for obvious health reasons but also to try and set a positive eating example for my daughter) there are just those times, days, and weeks where you want to sit back and enjoy a good salty chip (Lays, Ruffles, Kettle, name your brand….) I finally caved to my chip craving this afternoon, and I made my favorite dip too. After all, everyone knows chips go better with dip! So tomorrow I will eat my veggies, but today I am eating chips……..

This clam dip is pure comfort food to me. When I was pregnant and dealing with morning sickness, clam dip and those little hostess chocolate donuts were the only thing I craved and wanted to eat. Weird and a little gross, I know. In college, I would make a big bowl of this anytime I was in the middle of exams or writing a big paper. I would eat it all week for breakfast, lunch and dinner, totally disgusting my poor roommate. (When you open the clams, the smell is less than appetizing, but once it is all mixed together, the smell fades away, promise!) The resulting dip is creamy, salty and super addictive. (My dad and I once chowed through a whole bowl of this one Thanksgiving day, it was just us two, so there was no one else around to bear witness to our gluttony!) I like to serve this dip alongside Reduced Fat Ruffles. Not sure how much lower in fat they actually are, but that label sure makes me feel better!

Clam Dip

1 lb lowfat sour cream or IMO substitute (If you want a light and airy dip, go with sour cream, if you want it thicker go with the IMO.)
1 6.5 ounce can minced clams, drained (reserve 1 tablespoon of the clam juice)
1 tablespoon clam juice (reserved from the canned clams)
1 tablespoon Worcestershire sauce
1 tablespoon fresh lemon juice
1/2 tablespoon garlic salt
1/8 teaspoon pepper
Potato Chips

In a medium bowl put sour cream, mix in clams, clam juice, Worcestershire, lemon juice, garlic salt, and pepper. Taste, and add more garlic salt or Worcestershire as necessary. Indulge a little!

Saturday, May 9, 2009

Busy Mom's Lemon Chicken


I was given this recipe several years ago by a very busy working mother. She was a professional and worked very long days but she always managed to put a nice hot meal on the table for her family. While I think she was a great mother, I don’t think there was anything extraordinary about that. Most moms I know or grew up with did the same. That is the wonderful thing about moms. They can take a simple recipe and with a little love, it becomes a tasty and comforting dinner time staple.
Happy Mother’s Day Mama’s!!

Lemon Chicken
Serves 4
4 boneless, skinless chicken breasts
2 lemons , 1 sliced , 1 grated and juiced
4 tablespoons brown sugar
1 ½ cups chicken broth
1 clove garlic, minced
2 tablespoons vegetable oil
Flour
Salt and Pepper
Preheat oven to 350 degrees.

Make 2 plates, one with the juice of 1 lemon and the other with a cup of flour mixed with ½ teaspoon salt.

Dip each piece of chicken 1st in the lemon juice and then dredge through flour, shaking off excess. Set aside. Heat 2 tablespoons oil in large frying pan over medium high heat. Brown chicken breasts 2 minutes on each side. Place chicken in 8 x 8 pan. (Grease if not using a glass pan!) Top chicken with the broth, rest of lemon juice, and minced garlic. Sprinkle chicken with lemon peel and brown sugar. Top with lemon slices and bake covered for 45 minutes at 350 degrees. Pour lemon sauce over rice and serve!

Wednesday, May 6, 2009

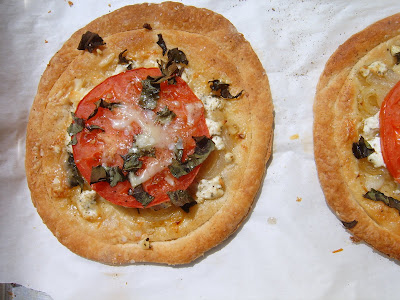
A Light Lunch : Goat Cheese & Tomato Tarts


My sister is the pickiest eater I know. She is getting better as she gets older, but her specific food likes/dislikes are known to drive the sanest of people a little crazy: "I don't like pasta, but I like linguine." and " I only like chocolate chip cookies, nothing else." that is only a small sampling of her many "foodisms" , which make me loco, especially when she is my house guest! Over the years I have learned not to cater to it, if she wants something she can go to the store and get it herself, but it is always nice when she actually likes the food I make. It never ceases to surprise me when she bites into something I have cooked and instead of making a face says "Lyndie this is pretty good."

Last Sunday afternoon when my sister was visiting, I made these for lunch, and they were a big hit all around, not a bite left. The flavors are light, summery, and fresh, balancing each other out and not overwhelming at all. I know it isn't tomato season yet, but there is a vendor at my farmer's market who sells these big, hydroponic, beefsteak tomatoes. They aren't quite up to the late summer standard, but they are ripe and juicy, just the thing you want to taste after a fresh tomato deprived winter. My sister called these "pizzas" even after I corrected her in my big sister voice that they were "tarts". But who am I kidding? Potato, patata.

Tomato & Goat Cheese Tart
Serves 4
Adapted from Barefoot Contessa at Home

1 package puff pastry (2 sheets) I prefer Trader Joe's Artisan brand
2 large sweet or yellow onions, thinly sliced
4 garlic cloves, cut into thin slivers
1/4 cup dry white wine
1/2 teaspoon Kosher salt
1/8 teaspoon pepper
2 teaspoons fresh thyme, minced
3/4 cup freshly grated Parmesan cheese
4 ounces garlic and herb goat cheese
1 large tomato cut into 4 slices (about 1/4 inch thick)
3 tablespoons basil, julienned
3 tablespoons olive oil, plus a little more for sprinkling
Parmesan cheese shaved with a vegetable peeler

Roll out a puff pastry sheet on a lightly floured surface. Roll the pastry out into about an 11 x 11 square. using a 6 inch wide circle, saucer, or other round object as a guide (I used a salad plate) cut two circles out from the puff pastry. Repeat with the 2nd sheet to make 4 circles in all. Place circles on two sheet pans lined with parchment paper. Refrigerate until ready to use. (This part is important, you don't want the pastry dough to be warm or it won't rise properly!)

Heat 3 tablespoons of olive oil in a large skillet over med/med high heat. Add the onions and garlic. Saute for 20 minutes, stirring frequently until the onions are soft and almost all the moisture is gone from the skillet. Add salt, pepper, thyme and the wine. Cook for another 10 minutes, until the onions are lightly browned. Remove from heat.

Preheat oven to 425 degrees.

Using a sharp knife, score a 1/4 inch wide border around each pastry circle. Make pricks inside the inner circle of the scored border of the puff pastry with a fork. Divide the grated Parmesan cheese into 4 , sprinkling the cheese on the inside of each scored border of the puff pastry circles. Place 1/4 of the onion mixture on each circle, again staying within the scored edge. Crumble 1 ounce of goat cheese on top of the onions on each pastry circle. Place a slice of tomato in the center of each tart. Sprinkle each tart with olive oil, salt, pepper, and fresh basil. Shave pieces of Parmesan on top of each tart. (About 5 to 6 shards).

Bake for 20 to 25 minutes, until the pastry is golden brown. Serve!

Sunday, May 3, 2009

Cookies for Mama


My mother is a cookie fiend. Now before you go picturing a 500 pound woman, think again. She is annoyingly skinny. She passed the cookie fiendishness down to my little sister and I (still waiting on the annoyingly skinny part!) When she and my sis come to visit from California, we usually go through dozens of cookies. We have been known once or twice to special order chocolate dipped shortbread and drive 40 minutes out of the way for a COOKIE. So with their impending arrival this weekend I wanted to make a very special batch of cookies, a batch that could also masquerade as a Mother’s Day gift. I knew there was nothing my mama would like more….

I am not going to take any credit for this recipe, not for improvising and not even for finding it. Many food blog readers have probably ran across this recipe by now, since it was published by David Leite in the New York Times last July. The recipe kept popping up with rave reviews everywhere, so I just knew I had to make them, because they were going to be oh so good. I really feel like the biggest secret to this recipe is the dough refrigeration time, Leite does an excellent job explaining the reasons for this in his NYT article. For his original recipe, click here. For a good adaptation click here. And for a gluten free version click here. I used the Orangette’s version. The only thing I did different was I used all purpose unbleached flour and all purpose bleached flour instead of the cake flour & bread flour. I also just used Ghiradelli semi-sweet chocolate chips 60% cacao. I tried the 1st batch with sea salt on top, like the original recipe, but my family requested that the next batches be left salt free. They liked them better without the sea salt! In case you’re wondering I did make these myself, not the baker in the family (aka, Jon). The hardest part of this recipe? Leaving the cookie dough sitting in the fridge UNEATEN for 36 hours before baking!

They turned out delicious! These are the perfect cookies: big, chewy, soft, sweet, salty, and oh so chocolaty! By Sunday morning there were only 2 left. I probably would drive 40 minutes out of my way for these cookies….Thank God I can just make them at home.

Friday, May 1, 2009

Tomato Orange Soup


Have you ever had one of those cooking moments where after tasting a dish in a restaurant once or twice (or in this case for years) you manage to go home and recreate the dish in your own kitchen? These moments of accomplishment are some of the best around. I was lucky enough to have one of those moments tonight and with this soup…..

For several years I have been buying quarts of Tomato Orange Soup from Elephants Delicatessen in Portland. I love this soup. Even when I was in college, if I was in Portland I would always manage to pick up some and take it back with me to Corvallis. Now a days, I like to stop by and grab a cup on my way to play at Washington Park for the afternoon. But lately, I have been frustrated with the service at the delicatessen. There are always plenty of staff but they never seem to be organized and as a result there are a lot of customers left waiting. I don’t mind waiting for good food. However, I do mind waiting when all I want is a pint of pre-made soup, there is nobody in line in front of me and employee after employee keep walking by but not assisting me in spending my money. Not to mention a toddler on my hip who wants “DOWN!” So on this day, after not being helped in above manner, I left with toddler in tow, and headed up to the park frustratingly soup-less. I might not have had any soup with me, but I still had that pesky tomato orange craving hanging around…..

When I got home, my hankering still had not eased, so I decided to do a little internet research to see if I couldn’t come up with a comparable recipe. To my delight I found out that the soup was so popular at Elephants Delicatessen in 2002 (which coincidentally is right around the time I discovered it as well) that they let the Oregonian run the recipe. So I had the exact recipe for the soup at my fingertips! Better yet, the ingredients were very simple and I had everything I needed right in my pantry to make the soup. I did change the recipe a little bit, using what I happened to have on hand. The most notable change was that I didn’t use any cream. I was able to create a whole pot of soup for less than $5 and it tasted incredible! If you think tomato and orange don’t compliment each other, think again! I even thought my version tasted better than the original, in that completely satisfied way you can only get from making something yourself…..

I served this soup with Tillamook Pepper Jack Grilled Cheese sandwiches for dipping of course!

Tomato Orange Soup
Serves 4

½ cup unsalted butter (1 stick)
1 small yellow onion, chopped
½ tablespoon chopped fresh thyme
28 ounce can Muir Glen Organic whole peeled tomatoes in juice*
¼ teaspoon baking soda
1 teaspoon salt
½ teaspoon pepper
1 cup fresh orange juice
¼ cup whole milk
* you don’t have to use Muir Glen brand but I feel like they are the best tasting , readily available canned tomatoes.

Melt butter in large pot over medium heat. Add chopped onion and sauté until translucent, about 5 minutes. Add fresh thyme, tomatoes , baking soda , salt and pepper. Bring soup to a boil and simmer uncovered until slightly thickened, about 15 minutes. Using an immersion blender, blend soup until smooth.* Add cup of orange juice and stir. Bring the soup back up to a gentle simmer, add whole milk and stir until blended. Season to taste. Serve!

*You can use a blender or food processor, but be careful, hot liquid expands when blended and this part can be tricky. I highly recommend buying an immersion blender it will make your soup making so much easier!