Monday, October 12, 2009

Spaghetti Carbonara


I have always been a little scared to make this, for a long time it didn't sound that appealing, and for a shorter amount of time I didn't think I could do it, I just knew I would end up with scrambled eggs and spaghetti noodles.....and to be honest, when I was testing out different recipes, I did end up with just that! Practice makes perfect though, and I wish I had discovered spaghetti carbonara a long time ago! There are oh so many different versions of spaghetti carbonara out there, but I like this one, simple, comforting and quite a mouthful!

Spaghetti Carbonara
Serves 4

5 ounces pancetta, thinly sliced or finely diced
3 tablespoons olive oil
4 cloves garlic, finely grated or pressed
3 eggs
1 cup finely grated Parmesan
1/2 cup pasta water
1 pound spaghetti
3-4 tablespoons chopped Italian parsley
Salt and Pepper

Start a pot of salted water to boil. In medium saucepan, heat olive oil and pancetta over medium/medium high heat until pancetta is brown and crisp, about 6 minutes. When pancetta is brown, add in finely grated garlic and cook until just fragrant, about a minute. Remove from heat. (You might want to keep this on a very low flame to keep warm while you prepare the rest of the dish!) In a small mixing bowl, whisk together Parmesan and 3 eggs until mixture is smooth and free of lumps, set aside. Cook Spaghetti until al dente, about 9-10 minutes, making sure to reserve about a 1/2 cup of pasta water. Now this is the part you have to be precise and quick about or you will end up with scrambled eggs!! Drain pasta and immediately toss hot pasta with olive oil and pancetta until all the pasta is completely coated in pot. Make sure there is no heat still on/under pot! As soon as pasta is coated, add egg mixture tossing pasta and eggs rapidly with tongs until well combined. Don't worry, the heat from the pasta will cook the eggs! Add pasta water if needed to thin the sauce. Season with salt and pepper and garnish with chopped parsley. Serve immediately!


Wednesday, October 7, 2009

French Apple Tart


I made my first apple pie as a sophomore in high school for my crush at the time, Aaron. I worked diligently all day making this humongous apple pie with the fancy lattice work and everything. My motivation was based on the philosophy that the way to a man's heart is through his stomach. I still believe this rule with 2 exceptions: one, food is the way to any person's heart, not just a man; and two, the food needs to actually be good for the rule to work. I never even tasted that first apple pie, and the relationship went nowhere, so I can only conclude that the pie was a dud, but that turned out to be a good thing because the guy was a dud too.

Nevertheless, I stayed far away from any kind of pie making and anything to do with apples for quite some time. I was in truth intimidated by apples, I thought you needed one of those fancy Pampered Chef apple peeler/corer tools. I thought wrong. All you need for baking apples is a vegetable peeler and a melon baller. Peel apple, cut in half, take out core with melon baller, slice , done. This is a great method when working with pears as well!

I use apple butter on this tart, which is widely available this time of year. I buy mine at this wonderful little cafe, thats food probably deserves it's own post! If you don't have any apple butter, try reducing some apple cider, and topping the apples with that. This tart will make your house smell so so good, be sure to serve a la mode and I think you will have a sure fire path to anyones heart, whomever that may be!

French Apple Tart
Serves 6-8

Tools: One 8 or 9 inch tart, quiche, or creme brulee pan

Pastry

1 cup all purpose flour
1/4 teaspoon kosher salt
1/2 tablespoon sugar
6 tablespoons unsalted butter, cold and diced
1/4 cup ice water

Note: Instead you could use a 1/2 sheet premade puff pastry, but only do this if tart is going to be eaten all in the same day. Roll out puff pastry into tart pan and proceed to the apple step!

Place flour, salt, and sugar in a food processor fitted with a steel blade. Pulse to combine. Add the butter and pulse until the butter is in small bits and looks like little peas. With the processor running, pour in the ice water and pulse until dough is combined. Place dough onto a floured surface and knead quickly into a ball. Wrap in plastic wrap and refrigerate for at least a hour and up to one day.

Apple Topping

2 green apples, such as Gravenstein or Granny Smith
1/4 cup sugar
2 tablespoons cold unsalted butter, diced into small pieces.
1/4 cup apple butter

Preheat oven to 400 degrees. Line your tart pan with parchment paper. Roll the dough into a circle. Dough may be sticky, if so just keep adding a little flour until dough is manageable. Place dough in the tart pan and using a knife, trim the edges. Refrigerate prepared dough until ready to use.


Peel and core apples. Slice the apples into half moons about 1/4 inch thick. Place apple slices overlapping in diagonal rows, until the pastry is completely covered. Sprinkle with the sugar and dot with the butter. Bake for 45 minutes to an hour until the pastry and apples start to brown, rotating once. When the tart is done, heat up the apple butter and brush over apples. Serve warm with ice cream! I recommend
Haagen Dazs Dolce De Leche!

Tuesday, October 6, 2009

Basil Aioli


BLTS, other wise known as bacon, lettuce and tomato sandwiches have always been my ultimate comfort food. When I was little, my mom would make BLTS and chocolate shakes as a special dinner for my sister and I. Now, whenever I need a little pick me up, guess what I'm having? Even if I am feeling lazy, I'm lucky enough to live just down the street from the best little diner. A diner that has cornered the market on this particular combination.

The first year Jon and I were married we ate BLTS for dinner EVERY Sunday night. Ten newlywed pounds and a high cholesterol diagnosis for the hubby later, we cut out that Sunday night ritual, saving those comforting bacon sandwiches for "special" occasions. "Special" occasions where I can think of a better reason besides just wanting to eat bacon and mayonnaise together, and what is more special than mom coming to visit? On her last trip up, inspired by my abundance of basil, (and basil being the one herb that I didn't kill in the heat wave!) I decided to experiment with a basil mayonnaise, or basil aioli. This basil aioli is fantastic! The aioli elevated my BLT from ordinary to definitively "special occasion-ish".

After reading this list of ingredients, you might be thinking to yourself: anchovy paste? Seriously? Seriously. This is the secret ingredient. And if you are thinking what am I going to do with the leftover anchovy paste? Well, it keeps forever, you will want to make this aioli again , and anchovy paste is a great ingredient to add to zesty tomato sauces. If you aren't a fan of the bacon sandwich, don't worry, this aioli would be wonderful on any sandwich! I often use the leftovers to dress a simple sandwich of lettuce and roast chicken.


Basil Aioli
Adapted from a recipe in the July 2008 issue of Bon Appetit Magazine

Yield: 1/2 cup , recipe can be easily doubled!

1/2 Cup mayonnaise (Best Foods!)
10 leaves fresh basil
1 garlic clove
1/2 teaspoon anchovy paste
1/4 teaspoon Worcestershire sauce
1/4 teaspoon red wine vinegar
1/2 tablespoon lemon juice
1/2 tablespoon warm water
generous dash of cayenne pepper

In a food processor combine mayonnaise, anchovy paste, basil, garlic, vinegar and Worcestershire sauce until smooth, slowly add in warm water, lemon juice, and cayenne. Adjust seasoning with salt and pepper if needed. Keep refrigerated until using.

Monday, October 5, 2009

Roasted Pork Tenderloin with Figs, Apples, Marsala, and Honey


This pork roast is juicy, sweet, savory, and will make you glad the rain is back and there is a chill in the air. This roast can easily feed 4-6 people and is wonderful for entertaining. If you want to, tie the roast into 2 inch sections for even cooking, but if you are like me and forgot to buy kitchen string, it's okay. The roast won't look quite as pretty, but it will still taste delicious!

Pork Tenderloin with Marsala, Honey, Figs, and Apples
Serves 4-6

2 pounds boneless pork tenderloin, tied together in 2 inch sections
2 garlic cloves, minced
4 tablespoons olive oil
8 fresh figs, sliced
1 Granny Smith apple, peeled, cored and sliced into 1/4 inch slices
2 tablespoons clover honey
1/2 cup dry Marsala, plus 1 tablespoon
2 tablespoons flour
2 tablespoons butter
1/2 cup low sodium chicken broth
Salt & pepper
Rosemary sprigs for garnish (optional)

Bring Pork loin to room temperature from the refrigerator. (This is an important step when cooking beef and pork, making for more even cooking.) Preheat oven to 400 degrees. Rub pork tenderloin with 1 tablespoon olive oil and season generously with salt and pepper. Put the remaining 3 tablespoons olive oil in the bottom of a large roasting pan. Transfer pork to pan and place into oven for 10 minutes until the meat browns. Remove from the oven (keep the oven on!). Scatter the garlic, apple slices, and fig slices around pork in the pan. Drizzle honey over pork and fruit in pan. Pour Marsala over pork and return pan to the oven. Cook for an additional 30 minutes or until meat is 145 degrees. remove pork from pan. Cover pork with foil to rest while making the sauce. Place roasting pan over medium heat on stove. Add the flour and butter to roasting pan with the fruit and stir until the sauce thickens. Add 1 tablespoon more Marsala. Add UP to 1/2 cup chicken broth to thin the sauce. Pour sauce over roast, garnish with rosemary sprigs, slice and serve! This roast goes well with mashed potatoes, or any other fall vegetable puree, such as carrot, cauliflower, or sweet potato.

Tuesday, September 29, 2009

Tailgate Food


My favorite time of year is fall for many reasons, from pumpkin patches to that first cozy fire but a major one is that it is college football season. I love watching most sports but there is nothing so familiar and yet so unpredictable as a college football game. Even if your team is having a down year, it is so rejuvenating to pack up your ice chest and head down to the game amongst all your flag waving people. (Beaver Fans on I-5). You feel hopeful and excited as you near your Alma mater, and absolutely can't wait to park & open that cooler! Be sure to make lots, you'll want to share and you'll also need some nourishment as you sit in game day traffic. You might even want to double the cupcake recipe, either for a celebratory dessert or to drown your sorrows afterward. I am not sure what can be more comforting than peanut butter & chocolate. Be sure to pack something equally satisfying to wash it down with, game days can make you unusually thirsty!


For the cupcakes use your favorite chocolate cake recipe, the richer the better!

Peanut Butter Frosting
Adapted from the Barefoot Contessa

1 Cup powdered sugar
1 Cup creamy peanut butter (I like Jif)
5 Tablespoons unsalted butter at room temperature
3/4 Teaspoon vanilla extract
1/4 Teaspoon Kosher salt
1/3 Cup heavy cream

Beat powdered sugar, peanut butter, butter, vanilla, and salt in a bowl with an electric mixer fitted with paddle attachment. Mix on low speed until creamy. Add the heavy cream and beat on high speed until the mixture is light and smooth, about 2 minutes.


My girlfriend used to make these sandwiches up for what we called the after after party. For when the hot food is gone, but you need a little snack. On a croissant they also look elegant enough for a buffet, I have made them for baby showers and birthday parties. To make the celery more tender and less stringy, peel the outer layer before chopping There isn't really any measurement to the chicken filling, just make as little or as much as you need! Make the filling a day ahead to let the flavor develop! My sister claims she doesn't like pickles, but when I made these and left them in the fridge overnight, they we gone the next morning!

Croissant Chicken Salad Sandwiches

Croissants
Sliced Swiss cheese
Dill pickles , chopped
Celery, chopped
Roasted chicken, chopped (Roast your own, or use a store bought rotisserie chicken)
Mayonnaise
Ranch dressing (preferably homemade , if not use Hidden Valley)
Salt
Lots & lots of pepper!

Mix chicken with equal parts pickles and celery. Then mix in equal parts ranch and mayo until desired consistency. Season with salt and lots of pepper. Put in Tupperware to sit overnight so the flavors can develop! When ready to assemble, cut croissant in half horizontally. Place chicken salad mixture on bottom of croissant. Place half a slice of Swiss cheese on top. Place top of croissant down making a sandwich, cut in half!

Friday, August 21, 2009

Why I Have a Love/Hate Relationship with Computers

My computer has a virus. =(

So I have to send off my computer to who knows where to get fixed. I actually have been cooking and testing new recipes so I can't wait until it comes back and I can actually post the triumphs!

Thursday, August 13, 2009

Chicken Piccata


Have you ever just needed a go-to recipe? One that can be concocted of mainly pantry staples for when you are in a funk and don’t know what to fix or unexpected guests drop by? If any of this applies to you then you need this chicken piccata recipe. There are lots of versions of chicken piccata, some recipes call for white wine, some for crème fraiche, some for pasta, etc etc. Over the years, I have tried many different versions, and most have been at least good, many excellent. However time and time again I fall back on this recipe, because it is so basic and easy to perfect but also packs a ton of flavor. This recipe also gets a plus from me for using chicken stock instead of white wine, the chicken stock being easier to have on hand at all times (wine in general doesn’t last long in this house. I like to think of our house not as a cellar but more of a tasting room environment!) Chicken Piccata makes a wonderful meal anytime, but is also fancy and tasty enough to serve to guests, expected or unexpected! My absolute favorite way to serve this is with creamy mashed potatoes. You just can’t go wrong with the combination of butter, capers, and lemon…yum!

This recipe is adapted from Everyday Italian by Giada De Laurentiis

Chicken Piccata
Serves 4

4 Boneless, skinless chicken breasts
1 Cup All-Purpose flour
½ Teaspoon salt (Sea or Kosher)
½ Teaspoon pepper
4 Tablespoons unsalted butter , divided
2 Tablespoons olive oil
½ Cup chicken broth (the fat-free, reduced sodium kind)
3 Heaping tablespoons capers
Juice of 2 average size lemons
3 Tablespoons Italian parsley, chopped

Season the chicken with salt & pepper on each side. Dredge the chicken in flour to lightly coat, shaking off any excess. In a large pan, melt 2 tablespoons butter in 2 tablespoons olive oil over medium high heat. (Melting equal parts butter and oil is the best way to sauté most things, meats, fish, vegetables, etc!) Add the chicken to pan and cook until brown, about 3 minutes per side. Transfer just the chicken to a plate. (Not the sauce!)

Add the lemon juice, broth, and capers to the pan. Bring the sauce to a boil, scraping up all the brown bits. (Brown bits = flavor!) Put the chicken back in the pan and simmer until cooked through about 5 more minutes. Using tongs, transfer the chicken to a serving platter. Add the remaining 2 tablespoons of butter to the sauce, let melt, about 1 minute. Add chopped parsley. Pour sauce over the chicken and serve immediately!


Monday, August 10, 2009

Fabulous Summer Sides


It’s been awhile. So far August has proved to be the craziest month in the Markum house this year. Between family visiting, birthday parties, and weekend trips, I’ve barely had time to sleep, let alone blog. The crazy train doesn’t show signs of stopping anytime soon, so I figure I just better get on board and enjoy the ride!

August is the ultimate month for summer produce, our CSA box was so full this week, we could barely carry it out of the market! With almost everything at peak season , it's the perfect time to enjoy lots of delicious vegetable side dishes!

Sautéed Sweet Corn with Basil
Serves 4

6 Ears of corn
2 1/2 Tablespoons unsalted butter
1 Teaspoon Salt
1 Teaspoon pepper
7-8 Leaves Basil, julienned

Shuck the ears of corn, making sure to remove all the little strings. Stand corn upright on cutting board. Run a knife downwards, removing corn kernels. In a large sauté pan, add corn, butter, salt and pepper, cook over medium high heat. After about 8 minutes of cooking, add basil. Cook until corn starts to pop, about 10 minutes. Season to taste and serve immediately.

Garlic Green Beans
Serves 4

1 Pound green beans, ends trimmed
1 Clove garlic, finely grated
1 Tablespoon unsalted butter
Salt & pepper to taste

Boil large pot of salted water . When water is boiling, add green beans and boil 4 minutes. Immediately drain green beans in colander and run cold water over them to stop the cooking process. (at this point the green beans can sit for awhile while you prepare other parts of the meal.) Using the same pot, melt butter over medium high heat. Add green beans. Grate garlic clove over the green beans and sauté about 3 minutes. Season to taste with salt and pepper. Serve immediately.

Thursday, July 30, 2009

California Barbecue

The Northwest has been experiencing a record breaking heat wave the last few days (107 degrees today!) With no a/c in the house, not even I am crazy enough to cook in this weather, so I thought I would post a recipe from my trip back to California last weekend. As always, we barbecued! Californians love to barbecue, especially my family, and especially tri-tip. On a 4 day trip we had tri-tip 3 different days, cooked by 3 different relatives, and served 3 different ways: My grandma barbecued hers beforehand and then warmed it back up in the oven for a wonderful pool party lunch, my sister cooked hers in the oven to very well done, cutting holes in the meat and filling the holes with Worcestershire sauce, and my dad barbecued his rare, pouring apple cider vinegar on top (he is on a apple cider vinegar kick these days!) After all that tri-tip we still weren’t tired of it, or of barbecuing. I mean, what’s not to like about sitting outside enjoying great food with friends and family? California barbecue is meant to be fast and quick, allowing you to cook with drink in hand and then sit down and enjoy a meal with your guests. There is no special process or method, just a few required ingredients: fresh food, a nice cut of meat, good wine, and some friends!


My step mom Diane made this salad with the seasons first zucchini, this is an adapted version of a recipe she got from the health section of the New York Times. The salad is creamy and delicious, you would never know it was actually good for you ! The salad made an excellent side dish to the barbecued chicken and fresh grilled corn. If you wanted, you could leave out the lettuce and then the dish would be more like a salsa that you could serve with chips!


Zucchini-Avocado Salad
Makes 8 side-dish servings

1 Head Romaine lettuce, chopped for a salad
1 Medium zucchini, finely diced
5 Medium tomatoes, chopped
2 Jalapeño peppers, seeded and finely chopped
1/2 Cup chopped cilantro
1 Large avocado, finely diced
3 Tablespoons freshly squeezed lemon or lime juice
2 Tablespoons olive oil
Salt
Croutons (optional)

Sprinkle the zucchini with salt, and drain in a colander for 15 minutes. If the zucchini tastes too salty, give it a rinse. Combine the tomatoes, peppers and cilantro in a serving bowl. Mix the zucchini, avocado and lemon or lime juice in another smaller bowl. Season to taste with salt. Add zucchini/avocado mixture to tomato/cilantro mixture and toss gently. Toss in lettuce leaves and season to taste. Garnish with Croutons and serve!

Wednesday, July 22, 2009

Shameless Self-Promotion


Some of you may or may not have noticed that my posts lately have been less frequent than usual. A small part of this can be blamed on the summer weather and the fact that I would just rather have my feet in the kiddie pool than in the kitchen. The bigger part of this story is also that my mind and energy have been on other things, like starting a little business with my girlfriend Julie. The company is called Pookie&theBean, and we specialize in hair accessories for little girls, or clippies. We have been very excited about this project for a long time and thanks to Julie's tech savvy husband Gavin, our website is finally up and running! We are also on Facebook so if you are a member look us up! Please tell your friends & family about us and if you can, come visit our booth at the Multnomah Days Celebration in Portland, Oregon on August 15th! Our clips will also be available at the Felicity Boutique in Salem, Oregon starting in September!

Sunday, July 19, 2009

Peanut Butter Chocolate Chip Cookies


I know, I know, two dessert posts in a row! With this summer heat, we've really been eating very simple, grilled meats and veggies, light pastas, that sort of thing. The only reason I have turned on my oven is to bake, I like to think no matter how hot, most people would, in the name of chocolate....

In the heat of summer I like to mix this cookie dough up at night and then bake them first thing in the morning, before it gets too hot. After making the best cookies ever, I am also now a firm believer in the refrigerated dough method. This cookie recipe is for a small batch of cookies, if you want more, just double it. I like the fact that this recipe only makes a small batch, with only 2 adults in the house, we really don't need to be consuming 3 dozen cookies, and if they were there, well, we would!

Peanut Butter Chocolate Chip Cookies
Makes about 18 2-inch cookies

2 Sticks (1/2 cup) unsalted butter, at room temperature
1/2 Cup granulated sugar
1/2 Cup brown sugar, packed
3/4 Cup peanut butter
1 Large or XL Egg
1 Teaspoon vanilla
1 Cup flour
1 Teaspoon baking powder
Pinch of salt
1 Cup semisweet chocolate chips

With a mixer, cream butter and sugars together until smooth. Add peanut butter and mix until well combined. Add in egg, stir well, then vanilla also stirring well! Add flour, baking powder, and salt. Stir until just combined. Stir in chocolate chips. Cover tightly with plastic wrap and refrigerate overnight.

Preheat oven to 375 degrees. Line baking sheet with parchment paper. Using a spoon, drop little scoops of dough on parchment. Press down on the centers slightly to flatten a little with the spoon. Bake for 13 minutes or until golden brown. When done, remove cookies and place parchment paper with cookies on wire rack to cool.

Sunday, July 12, 2009

Ice Bath Brownies


The greater part of seven years ago, I was out on my own for the first time, and learning how to cook by myself. My kitchen was carpeted (horrible I know, I know!) One evening while pulling my mastered specialty of Gouda stuffed chicken breasts courtesy of the Betty Crocker Cookbook out of the oven, I accidentally set the glass baking dish on a burner I had forgotten to turn off. In less than 5 seconds, there was a loud popping sound and glass shards and Gouda stuffed chicken were everywhere, including that lovely carpet. Luckily no one was in the kitchen at the time, and I considered it a lesson learned, and vowed to never do something like that again.

Time passed, I learned to be more careful and during the next 7 years, exploding glass didn‘t occur in my now un-carpeted kitchen again, until last week that is.... In a previous post I mentioned my brownie recipe disaster. Now the recipe itself was not disastrous, but the baking methods of a tired mama were. This specific brownie recipe calls for the brownies to be placed directly in an ice bath after coming out of a 400 degree oven. Due to the whole ice bath thing, the brownies need to be baked in a tin pan, and I unfortunately baked them in a glass pan. Well what happens when you put a 400 degree glass pan into an ice bath? Um, it uh, explodes and you end up with soaking wet brownies and little pieces of glass all over your kitchen! Using a glass pan is not recommended! PLEASE WHEN MAKING THESE BROWNIES USE A METAL PAN! If you use a metal pan, these brownies will come out moist, fudgy, and decadent, the way they did the next time I attempted to make them. The ice bath method creates a brownie that is crisp on the outside and creamy on the inside, equalling brownie perfection! These brownies would taste even better if you added walnuts, I did not because the hubby is a not a walnut fan. Next time I make them I think I will use walnuts, and then I can have them all to myself……

When choosing a chocolate for this recipe, use something decent, like Ghirardelli. Don’t be tempted to buy the Bakers chocolate because it is cheaper, it tastes cheaper too!

Ice Bath Brownies
Makes 16 2-inch brownies

8 Tablespoons unsalted butter
4 ounces unsweetened chocolate
1 ¼ Cups sugar
¼ Teaspoon salt
1 Teaspoon vanilla extract
2 Large eggs
½ Cup all-purpose flour
2/3 Cup walnuts (optional)
1 8-inch square metal pan, lined along the bottom and sides with parchment paper or tin foil.

Preheat the oven to 400 degrees. Position the rack in the lower third of the oven.

Melt the butter and chocolate together in a medium saucepan or double boiler. When the mixture is melted and smooth, remove from heat. Stir in the sugar, vanilla, and salt. Add the eggs, one at a time. Stir in the flour and beat with a spoon until the batter in smooth and glossy. The batter is ready when it starts to pull away from the sides of the pan. Stir in the nuts. Spread the batter into the pan. Bake for 20 minutes or just until the brownies start to pull away from the sides of the pan. The center of the brownies will still be gooey when tested with a toothpick. While the brownies are baking, prepare and ice bath. Fill a large baking pan or roasting pan with ice cubes and water until about ¾ inches deep. When the brownies are ready, remove pan from the oven and set immediately in the ice bath. Be careful not to splash any water on the brownies. Cool the brownies in the ice bath, and then cut and serve!

Wednesday, July 8, 2009

Twilight Ale


I have to say that when it comes to beer, I am usually a self-proclaimed Widmer girl, as in Hefeweizen. In fact, today, driving through town running errands, I pulled up next to a Widmer delivery truck. As the truck turned off onto a side street, for a split second I felt the urge to follow it, but just for a split second. That is how much I like that yellow and black labeled brew! But lately in the name of education*, I have been trying to expand my beer palette. I have been venturing out to different brewpubs and when picking up a 6 pack at the store I will mix and match it, creating my very own sampler pack, instead of just buying a 6 pack of all the same brewskis. (I am pretty sure by now the beer stocking guys at Fred Meyer have me on a hit list!) Mixing up a 6 pack is lots of fun actually, and a lot more economical than say buying 6 bottles of wine when you want a little variety in life. Holding our own little beer tasting is also a favorite activity at the Markum house for a stay at home date night. This last time I mixed up a 6-er of Deschutes Brewery Beer. In the pack I had selected a bottle of their seasonal brew, Twilight Ale. I really liked it! Twilight Ale is a light, drinkable summer beer, but still has a nice malty character. I love what the website says about it " Best when served chilled and consumed outside." Doesn't that already sound like a good time? Deschutes Brewery also makes my favorite Porter: Black Butte. Try that one as well if you haven’t already. Plus, if you are in the state of Oregon, July is Oregon Craft Beer Month, so a part of the proceeds of beer sold during this month will help go to support the Oregon Food Bank. The breweries I have confirmed to be participating are Deschutes, Widmer & Bridgeport. So in celebration of Craft Beer Month and in the name of charity and education* go mix up your own 6 pack today!.

Tuesday, July 7, 2009

Linguine with Snap Peas, Zucchini, Basil, & Gremolata


I was busy rifling through recipes to utilize some snap peas I had received in last week’s CSA box. Inside the box, I had found the attached instructions on how they should be eaten to be completely unacceptable. They were to: “just eat the snap peas, raw.” No thank you! Healthy eating can only take me so far, and it doesn’t take me far enough to sit and eat raw vegetables with no seasoning for dinner. If I died the next day I don’t want my last meal on earth to be raw snap peas, or carrots, or cauliflower, you get the idea. This was this reason for my fervent pursuit of a recipe, so I could use up the snap peas. I ran across this one, in the May 2008 issue of Bon Appetit, adapted it a little, and it turned out to be a pretty darn good summer pasta. I got my flavor kicks and also ate my veggies. Now that is a healthy compromise!

Serves 4!

Gremolata is garnish of parsley, lemon and garlic. In this recipe capers are substituted for the garlic.

Gremolata:

3 Tablespoons Italian parsley, chopped
1 Tablespoon lemon peel finely grated
1 Tablespoon capers drained & chopped
1 Tablespoon olive oil

Mix parsley, lemon peel, capers and olive oil in a small bowl set gremolata aside.

For the Pasta:

¼ Cup olive oil
12 Ounces linguine
1 small yellow onion, thinly sliced
4 cloves garlic, chopped
2 Red jalapeno chiles, thinly sliced
2 Zucchini cut crosswise into 1/3 inch slices
1 Cup snap peas
1Cup packed fresh basil leaves
1 Cup Parmesan cheese, grated

Cook pasta in boiling salted water until al dente. Make sure to reserve 1 cup of the cooking liquid. I like to do this buy sticking a heavy mug into the boiling water and scooping some out. While the pasta is cooking, heat the olive oil in a large skillet over medium-high heat. Add onion, garlic, and jalapenos, sautéing until soft, about 3 minutes. Add zucchini and snap peas and sauté until tender about 3 minutes. Season with salt and pepper. Add drained pasta, the cooking liquid (salted boiled water), basil and grated Parmesan cheese to the skillet. Toss until the basil is wilted and the pasta is coated. Season with salt and pepper. Top with gremolata and extra Parmesan cheese.

Tuesday, June 30, 2009

Lasagna, Mexican Style


The weather forecast predicts low 90’s this weekend in Portland. Growing up in the Central Valley of California, I am no stranger to hot summer weather, but everyone also had air conditioning and my grandparents had a swimming pool. But that is not the case up here, and 92 degrees in PDX feels like a 102 degree day in Merced because of the humidty. However I am not going to complain about it, the rain will be back soon enough and then you may/will hear me whining! In the meantime we will try and stay cool by finding a piece of shady grass or maybe a fountain to splash in, blowing up the kiddie pool, and grabbing a cold beer....

No matter how hot that thermometer reads outside, on Sundays I always turn on my oven, even if that means being uncomfortable while I cook. There is just something about Sundays that calls for something comforting and warm to fill your plate a little fuller than usual. Whether it be pot roast, baked penne, or this Southwestern take on lasagna, Sundays are just better with a hot family style meal. Even this Sunday after I recover from my 4th of July hangover of too many hot dogs, root beer floats and sun, I know I will turn on the oven, perhaps attempting yet again to make the brownie recipe (the one that turned out so disastrous last night!), despite the heat…...

Mexican Lasagna
Feeds a crowd! 8-10 Servings

1 Pound ground beef
1 Can (15 oz) golden corn, drained
1 Can (15 oz) tomato sauce
1 Cup salsa , mild, like picante
1 Tablespoon chili poweder
1 ½ Teaspoons cumin
16 Ounces Cottage Cheese
2 Eggs, beaten
¼ Cup Parmesan
1 Teaspoon Oregano
½ Teaspoon garlic salt
1 Cup Cheddar, shredded
12 Corn tortillas

Preheat oven to 375 degrees. Brown ground beef in medium pan over medium high heat. Add corn, tomato sauce, salsa, chili powder and cumin. Simmer 10 minutes. Meanwhile, in separate bowl, combine cottage cheese, beaten eggs, parmesan, oregano, and garlic salt. Set aside. Grease large 13 x 9 baking glass baking dish. Place 6 corn tortillas on bottom. Top with 1//2 the cottage cheese mixture, then half the beef mixture. Repeat with tortillas, then cottage cheese, and then beef. Just like if you were making lasagna! Then top with the shredded cheese. Bake for 30 minutes!

A typical Sunday afternoon family portrait....

Tuesday, June 23, 2009

Ode to Strawberries Part 3: Strawberry Rhubarb Crumble


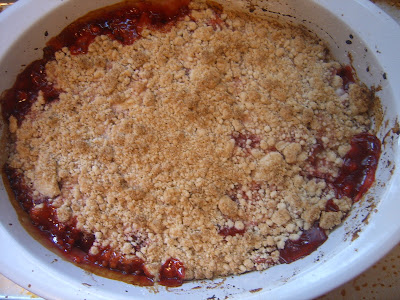
This last Sunday we picked up our first CSA box of the season and I am happy to say that I was not disappointed. We received a nice assortment of fruits and vegetables and even a potted plant. Picking up the box is also kind of exciting, because you don’t really know what you are going to get. It reminded me of the feeling I used to get as a little kid buying one of those “mystery” goody bags at the toy store, and then eagerly ripping open the bag to see just what treasures it held. One of the treasures this week were 2 pints of fresh, red strawberries. But like anything in life, along with the treasures also come the challenges. This weeks challenge was the rhubarb. I have never cooked with rhubarb, and really know very little about it. What I did know was that it needs to be cooked for awhile, and that it supposedly goes well with strawberries. Looking at the rhubarb itself was a bit daunting. Raw rhubarb basically looks like a big fuschia celery stick. I toyed with the idea of making some sort of jam, cake, or crisp but ultimately decided on this crumble. I also toyed with the idea of not using the rhubarb at all, but that would be wasteful and I promised myself that if we purchased the CSA box this summer I would utilize every last piece of produce, so I made the crumble. And I am so glad I did! This crumble was very simple to prepare, smelled great while baking and came out of the oven, gooey, sweet and well, crumbly. This crumble topping is super versatile and I can’t wait to use it again in a month or so when raspberries and blackberries are in season!

Strawberry-Rhubarb Crumble

For the Filling:

1 Cup rhubarb, chopped roughly into 1 inch pieces
1 ½ Cup strawberries, hulled and quartered
1/3 Cup sugar
Juice of 1 lemon
3 Tablespoons cornstarch
1/8 teaspoon salt

For the Topping:

1 1/3 Cup flour
1 stick unsalted butter, melted
3 Tablespoons sugar
3 Tablespoons brown sugar
Zest of 1 lemon
1 Teaspoon baking powder

Preheat oven to 375 degrees. In an 8 x 8 pan, (you could use a 9 inch pan, or a pie pan, I actually used a 10 inch oval gratin dish.) mix the ingredients for the filling together. Your hands work best for this! Spread filling evenly over bottom of pan. In medium bowl, mix together ingredients for the crumble topping until small and large lumps form. (I.e; crumbles). Sprinkle topping generously over filling. Bake in oven until topping is golden brown and bubbly, about 45-50 minutes. Serve with a scoop of vanilla ice cream!

Sunday, June 21, 2009

Daddy's Barbecue Ribs with Pomegranate Glaze and Grilled Vegetables


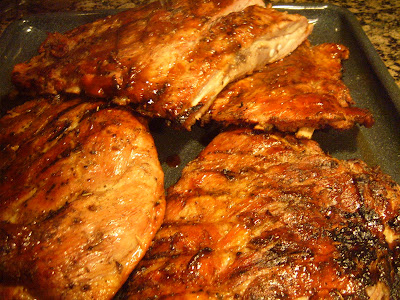
My dad is a real grill master. He can make any cut of meat taste and smell delicious on his barbecue, and even tempt me to try proteins that I would normally shy away from. Um deer anyone? While deer wasn’t my favorite, it wasn’t that bad either. Whenever we have the chance to get together, I look forward to him barbecuing, it never gets old, and there always seems to be a new technique for me to learn or pick up. Last weekend, my dad was up visiting and on Sunday evening we decided to barbecue. My husband Jon really wanted to learn how to cook ribs, and my dad was going to show him how. We barbecued pork spareribs, sweet potatoes, asparagus, and onions studded with garlic. At the last minute, I realized I had no barbecue sauce, so I whipped one up, using pomegranate molasses. The sweetness of the molasses complimented the spiciness of the pork perfectly. The meal turned out so wonderful, that I thought I would share the whole thing with you. The only thing I would change about it is that I wish could enjoy barbecues with my dad more often!
Happy Father’s Day Daddies!

Barbecued Ribs
1-2 racks pork spareribs (about 5-6 pounds each)
Brown sugar
Oregano
Red pepper flakes
Dried garlic
Sea Salt
Pepper

In prepping the ribs, you will need to estimate the quantities based on the size of your rib racks. Basically, you are making your own rub and you want all the meat covered in a thin layer of seasoning. Rub seasonings all over the top side (meat side) of the ribs. On the bottom side (bone side) season with some more salt. Cook ribs covered on heated grill over low, medium-low (this part depends on how hot your grill runs!) for 1 hour, 40 minutes, turning occasionally. After an hour and 20 minutes, brush ribs with a light layer of barbecue sauce and let cook another 15 minutes. Remove ribs from grill, place on large tray, cover with tin foil, and place in oven to keep warm while you make the rest of the vegetables.
Pomegranate Barbecue Sauce
enough for 1 rack of ribs....

¼ Cup ketchup
1 Tablespoon Worcestershire sauce
½ Tablespoon Pomegranate molasses
1 Teaspoon Honey
1/8 Teaspoon cayenne pepper

Whisk all the ingredients together and brush on meat!

Roasted Onion and Garlic

1 Large Walla Walla or Vidalia Sweet onion, peeled
1 Clove garlic, cut into slices
Olive oil
Salt & pepper

Take onion and cut in half horizontally. Top with garlic slices, trying to wedge the garlic into the onion. Drizzle with olive oil and season with salt and pepper. Wrap each onion half tightly in aluminum foil and put on the grill with the ribs for 1 hour, 40 minutes . Remove from grill, keeping onion wrapped in tin foil until the other vegetables are ready.

Grilled Sweet Potatoes & Asparagus
2 Sweet Potatoes, peeled and cut into ¼ inch wide long slices
1 bunch asparagus, trimmed


Toss sweet potatoes & asparagus in olive oil until well coated. (It is best to use your hands for this part!) Season with salt and pepper. Put on the grill over low heat until asparagus is cooked through and sweet potatoes are slightly caramelized about 20-25 minutes. Remove from heat, put vegetables in serving dish. Open up onions and garlic and put on top of sweet potatoes and asparagus. The juices from the onion and garlic will run down onto the other vegetables. Don't worry, this is what you want!


Take ribs out of the oven and enjoy your barbecue!

Wednesday, June 17, 2009

Shell Pasta with Pancetta, Leeks, Mushrooms, and Tomatoes

It's been awhile. We have been busy with house guests the last week, I am in the middle of trying to start up a little business venture with a girlfriend (I will let you all know when that is up & running!)and my newly engaged sister is now visiting so of we have also been immersed in wedding planning! Of course we have still been eating delicious food, both dining out and eating in. Today for example, we trekked to the SE side to try the infamous "Reggie" at Pine State Biscuits. It was worth the wait and the 8 mile drive out of our way! We also had this pasta dish tonight for dinner.


I have really been into leeks lately, and this is a great way to use them. If you haven't cooked a lot with leeks, they are sort of like an onion, but milder and sweeter, they are incredible sauteed and caramelized as well. The shell pasta in this dish act as little spoons so you get bite sized scoops filled with all the ingredients. Bacon can be substituted for the pancetta, just be aware that the bacon has a much more aggressive smoky flavor than the pancetta. Bacon is more economical, but I really like the subtleness of the pancetta because it allows you to taste the blend of all the flavors! This recipe is loosely adapted from Gordon Ramsay's cookbook Fast Food.

Serves 4

1 Pound pasta shells also can be found as Conchiglie
3 Tablespoons olive oil
5 Ounces pancetta, sliced
3 Leeks, trimmed and finely sliced (white & pale green parts only)
10 Ounces Cremini mushrooms, trimmed and sliced
1 14 1/2 Ounce can petite diced tomatoes, drained
6 Ounces creme fraiche
salt & pepper
parsley, chopped for garnish

In this dish it is very important to season every layer as it cooks, and not just at the end! Heat a large pot of salted water, bring to a boil. Add pasta and cook until al dente. Meanwhile, heat olive oil in a large skillet over med high heat. Add the pancetta and cook until golden brown, then add the leeks, season with salt and pepper. Add the mushrooms and season with salt and pepper. Cook on high heat about 8-10 minutes until leeks are tender. Add the tomatoes, season with salt and pepper. Cook another 2-3 minutes. Add in creme fraiche, and parsley, stir and season with salt and pepper, remove from heat. Toss in cooked pasta shells. Season to taste. Serve immediately!

Tuesday, June 9, 2009

Homemade Ranch Dressing


Growing up in California, you eat a lot of ranch dressing. Ranch dressing is a permanent part of the California food culture, and it certainly was a part of mine as a little girl. I admittedly took it a little too far as a child, refusing any other kind of salad dressing, dipping everything from carrots and chicken tenders to French fries in the stuff. French fries with a side of ranch. Now that is quite possibly my absolute favorite way to eat ranch dressing, with fried artichoke hearts running a close second. In California, ordering French fries with a side of ranch, doesn’t bat an eye. Up here in Oregon, 90% of the time you are accommodated, but try ordering that in the Midwest, and then wait for the strange looks. In Europe, well forget about it, they don’t serve ranch there….I am glad nobody told me ranch dressing wasn’t as widely available everywhere else in the world back then, because at that age, I might never have left…..

Has all this talk of ranch dressing made you want some? Well I hope so, because it is ridiculously easy. I wish I had known how to make some years ago, I could have cut down on the home sickness! Homemade ranch dressing is also much better than that stuff from Hidden Valley.

I “borrowed” this recipe from the Gluten Free Girl , who had borrowed it from somebody named “Cookiecrumb” and I am sure Cookiecrumb borrowed it from somebody else, it is after all just a basic ranch dressing, classic and at its best.

Makes 3 cups

1 Cup buttermilk
1 Cup mayonnaise
1 Cup whole fat yogurt
1 Teaspoon dried dill
1 Teaspoon dried oregano
1 Teaspoon dried garlic
1 Teaspoon kosher salt
1 Teaspoon pepper
Juice of ½ a lemon

Mix all ingredients together in a bowl. Pour into container and refrigerate. Let dressing sit for 1 day before eating, this allows all the flavors to blend together! (This is important! Leave it alone, or it won’t taste right!) Serve with anything and everything =)
These veggies are just begging for some Ranch lovin!

Friday, June 5, 2009

Ode to Strawberries Part 2: Strawberry, Walnut, & Goat Cheese Salad with Pomegranate Vinaigrette


The weather yesterday was crazy, like a scene out of the Wizard of Oz. Sofia and I were cruising the farmers market (a mini one in the park behind my house, just started, yay!) and buying strawberries. Well I was the one buying while Sofia was “sampling” more like grabbing at all of them on the table and trying to stuff them in her mouth…Anyway, it was hot and sunny, humid, and downright uncomfortable. We walked back to the house and I stripped my little bug down to her designer Costco diaper, filled our glasses with ice water, opened all the windows and tried to cool off. Then within minutes, the wind picked up, the sky turned dark, lightning and thunder ensued and it began to hail. Yikes! Then again, it did add a dose of excitement to our day. The power in the Pearl District (where Jon works) was knocked out still today so Jon got an impromptu 3 day weekend….


Those strawberries? Well, I made a salad with them. The type of salad that makes a fantastic lunch, but add some grilled chicken and you have dinner. It is also the type of salad that comes in handy if say a thunderstorm rolls through and your power is knocked out….

Riesling would go very well with this salad!

3 Ounces goat cheese, crumbled
½ Pint sliced strawberries, sliced
½ Cup walnut halves, toasted
10 Ounces fresh spinach
¼ Cup apple cider vinegar
½ Cup olive oil
1 Tablespoon pomegranate molasses or syrup*
1 Tablespoon honey
1 Tablespoon fresh thyme, chopped
Salt and pepper to taste
* You might be asking yourself what you would do with the rest of a bottle of pomegranate molasses, besides making the obvious vinaigrette. Pomegranate molasses actually makes an excellent marinade for meats (I have coated a turkey in it several times) and also can be used in mixed drinks.

Whisk together the apple cider vinegar, olive oil, honey, pomegranate molasses, and thyme until emulsified. Season to taste with salt and pepper, set aside.
Place spinach in serving bowl, top with strawberries and walnuts. Sprinkle with goat cheese, and drizzle the vinaigrette over! Serve!

Monday, June 1, 2009

Ode to Strawberries Part 1 : Lemon Yogurt Cake with Strawberry Sauce


June marks the start of the strawberry season up here in Oregon. The return of the strawberry really does scream “summer has arrived!“. (If strawberries could scream that is….). The lines outside the booths selling them at the farmers market this morning looked like something out of 1980’s Moscow. (I would have taken a picture but it was way too crowded!) Despite all that wading through the crowd in the heat, it is definitely worth it for a pint or flat of the season’s first strawberries. The different booths offer samples to customers, so you can decide for yourself which farm offers the best berries. The added bonus? Most of the strawberry farms are from Corvallis, so if you wear your Oregon State gear, (which my husband always does) you will probably wind up with a few extra berries!

Fresh berries from the farm really do taste better! They are redder, naturally sweeter, and juicier than the ones at the grocery store, because they get to ripen on the vine before being taken to market. So go and buy some strawberries now while you can, whether it be from your local farmers market, farm, or roadside stand!

Coming home with this bounty of strawberries, I was so excited! Would I make lunch with them? Dessert? Or would I just eat them all plain, straight out of the basket? After calming down from my strawberry euphoria, I realized that I could do all those things and if need be, go back and push through the crowds to buy more.....

I have a confession to make. As much as I have stated in this blog and proclaimed aloud to my family, that I hate baking, I have started to like it. Maybe it is the controlled process, the concentrated measuring, or the gleeful smile on Jon’s face when I pull something sweet out of the oven, but baking has really started to appeal to me. This weekend, I really had an urge to make some sort of lemon cake. The two recipes it came down to were by Ina Garten (The Barefoot Contessa) and Molly Wizenberg (The Orangette). Molly’s French style lemon yogurt cake won out for two reasons: one, her chocolate chip banana bread recipe totally rocks, and two, I read that she met her husband Brandon via this recipe. Um, how romantic is that? So I had to make this cake, and of course I also had to make a strawberry sauce to serve alongside it! The way I make my strawberry sauce is more of a jammy consistency then a refined sauce. If you would like the sauce to be more syrupy, add another ½ cup of sugar, if you don’t want seeds, then pour sauce through a mesh strainer. This cake is wonderful, lemony, and crumbly, without being overly sweet. We found excuses to eat it all weekend, justifying our gluttony by insisting that the strawberry topping somehow made it healthy. I made this cake Saturday afternoon and it was gone by Sunday evening!

Makes 8 Servings

For the Cake:

1 ½ Cups unbleached all-purpose flour
2 Teaspoons baking powder
2 Teaspoons lemon zest
Pinch of salt
½ Cup plain WHOLE milk yogurt
1 Cup sugar
3 Large eggs
½ Cup vegetable oil

For the Lemon Syrup:

¼ Cup powdered sugar
¼ Cup lemon juice

For the Lemon Icing:

1 Cup powdered sugar
3 Tablespoons lemon juice

For the Strawberry Sauce:

1 Cup sliced strawberries
¼ Cup sugar
½ Cup water
1 Teaspoon lemon juice

Preheat oven to 350 degrees.
Grease a 9 inch round cake pan with butter. Line the bottom of the pan with a round of parchment paper, grease that too. In a medium bowl, whisk together the flour, baking powder, and salt. Add the lemon zest and mix well. In a large bowl, combine the yogurt sugar and eggs, stirring to mix well. Add the flour mixture and stir until just combined. Add the oil and stir well, until it becomes a smooth yellow batter. Pour into the pan. Bake for 25 to 35 minutes. (Insert toothpick into center of cake, if toothpick comes out clean, cake is done!) Cool the cake in the pan on a wire rack for 15 minutes. After 15 minutes, using a butter knife along the sides of the pan, invert the cake onto a plate. Remove the parchment paper, and invert the cake back onto the cooling rack. Set the rack on a baking sheet so that it will catch the dripping icing.

In a small bowl, whisk together the lemon syrup ingredients. Spoon the syrup over the warm cake slowly. Cool cake completely.

Meanwhile, combine strawberries, sugar, water, and lemon juice and bring to a boil in a small saucepan. Reduce heat and simmer 15 minutes. Let cool.

In a small bowl, combine the lemon icing ingredients. Make sure to mix well so the sugar is completely dissolved. Spoon the icing over the cake. Let sit about 1 hour. Serve cake with strawberry sauce.

Friday, May 29, 2009

Grillin & Chillin: Chicken Breasts with Balsamic Glaze


The last few weeks have been absolutely gorgeous here in Portland. In fact, I have developed quite a crush on the weather lately! I also have a little crush on this balsamic vinegar. Our friends Gavin & Julie over at The Haute Kitchen were generous enough to give us a bottle. Ever since, I have been trying to figure out ways to use this balsamic on anything & everything! ( If you want to know more about it, click here.) In the midst of trying to balance these two current infatuations, how might you ask do I show my affection? By cooking outside of course, grilling chicken and pairing that with a balsamic glaze. (Love is better when shared!)

Brining is a great method to use on meats that can often turn dry and tasteless after being cooked. The brining process lends itself well to cuts like pork chops and boneless, skinless chicken. These particular chicken breasts get a huge boost from a little overnight skinny dip in the brining liquid, which might seem a bit tedious, but isn’t at all, promise! You make the brine the night before and by the next evening your chicken is ready for the grill! Brining flavors the meat all the way through, the sugars and salt seep in through the whole piece of meat rather than just the top layer. After brining, there is really no need to add any extra seasoning, the chicken will be succulent and flavorful enough as is. The balsamic glaze is sweet, savory, and just a little bit sticky, giving the chicken that extra bit of oomph! This recipe can also be efficiently divided and conquered by one person grilling the chicken and the other person busying themselves with making the glaze.

Grilled Chicken Breasts with Balsamic Glaze
Serves 4

For the Brine:

3 Tablespoons kosher salt
3 Tablespoons packed brown sugar
6 Thyme sprigs
2 Garlic cloves, halved
¾ Teaspoons coarsely cracked black pepper
4 Cups water

Combine all ingredients in a saucepan over medium heat. Bring to a simmer, stirring to dissolve the salt and sugar. Remove from heat. Transfer to a container large enough to hold all the brine and chicken breasts. Let the brine cool completely add the chicken breasts and refrigerate over night. Make sure the chicken is completely submerged in the brine and nor floating or anything!

For the Chicken:
4 Boneless, skinless, chicken breasts

Remove chicken breasts from brine. Throw on a grill, either over medium low or low, depending on how hot your grill gets. Cook chicken breasts, about 8 to 10 minutes on each side. When chicken is done, add the chicken to the pan with the balsamic glaze, and cook on low, about 1 minute, turning the chicken in the sauce until coated.

For the Balsamic Glaze:

2 Tablespoons unsalted butter, divided
1 shallot, minced
2 Tablespoons balsamic vinegar
1 Tablespoon fresh sage, minced
1 Cup low sodium or light chicken stock

In a medium saucepan, over medium heat add 1 tablespoon of butter. When butter melts add the minced shallots, stirring until softened, about 2 minutes. Add the balsamic vinegar, bring to a boil, and let reduce by half, about a minute. Add the stock and sage, turning the heat to high and scraping up any browned bits with a wooden spoon. Reduce until sauce is a 1/3 cup, about 6-7 minutes. Remove from heat, adding the remaining butter and swirling until the butter melts. When chicken is done, add chicken to pan on low, about a minute. Make some sides and eat up!

Wednesday, May 27, 2009

Fish Tacos with Avocado & Tomato Salsa

I have decided this is going to be my shout out blog post . So please oblige me on these 3 shout outs. I am afterall, still sharing a recipe with you. The # 1 shout out is to my little cousin Aaron ( he is actually not so little anymore, but to me he will remain for all intensive purposes, my little cousin.) Aaron is serving over in Iraq right now. Thank you for the great job you are doing, we love you!! The #2 shout out is to 2 of my oldest friends, Liz & Kim who came up to visit this weekend. Thanks for coming and sharing your love for breakfast & beer! And finally my 3rd shout out is to my Aunt Wendy, who has to eat gluten free and often can not make the recipes I post. The following recipe however she can, so here is to you Wendy, cook this!

After a fun-filled but exhausting 3 day weekend, (Thank you Kim & Liz!) I am finally back into the cooking swing of things. I made these fish tacos tonight and they were really fresh, light , and tasty, basically the quintessential summer dinner. I used Rockfish (abundant in the PNW) but you could use Red Snapper, Cod, or even Catfish. You basically just want a light fish that won’t be too overpowering, that will absorb a lot of flavor, and stand up to broiling. This recipe is healthy & figure friendly, not to mention gluten-free (Wendy, make this!)

This recipe serves 4!

For the Salsa:

4 Plum/Roma tomatoes, chopped
1 Large Hass avocado, peeled & chopped
2 Tablespoons fresh lime juice
3 Tablespoons green onions, chopped
3 Tablespoons fresh cilantro, chopped
½ Jalapeno, minced with seeds.
Salt & pepper

Mix in medium bowl, season with salt and pepper. Let the flavors hang out and come together while you make the rest of the meal.


For the Fish:

1 Pound fish fillets, skinned & de-boned
2 Garlic cloves, minced
3 Tablespoons fresh lime juice
½ Jalapeno, minced with seeds
2 Cups thinly sliced leaf lettuce
¼ Cup pepper jack or Cotija cheese
6 -inch corn or flour totrtillas

Preheat oven to 350 degrees.

Place fish fillets in a single layer on a rimmed baking sheet. Season with salt & pepper. Mix garlic, lime juice, and jalapeno in a small bowl. Drizzle half the lime juice mixture over fish, reserving remainder. Let fish stand 15 minutes.


Meanwhile, wrap tortillas in aluminum foil and place in oven until heated through (about the 15 minutes). Remove tortillas, keeping them in foil until ready to serve. Preheat broiler. Broil fish until just opaque in center, about 6-8 minutes. Cut fish into 1 inch pieces. Top each tortilla with lettuce, fish, and some of the reserved lime juice mixture. Spoon salsa over and sprinkle with cheese. Enjoy!

This past weekend was Memorial Day Weekend, if you didn’t notice. We don’t just get a 3 day weekend at the beginning of summer so we can all barbeque and work on our tan. Men and women that have served and are serving our country as we speak, are the reason we celebrate this holiday, so please don’t forget that! Miss you Aaron! (Aaron is the Airman 3rd from the left, shaking hands.)

Thursday, May 21, 2009

Parmesan & Fresh Basil Cream Sauce


I recently bought these very rich smoked salmon raviolis by Monterey Pasta Company. The first time I had these, I made a simple pasta sauce out of olive oil and fresh basil but it just didn't pair well together, the smoked salmon was a little too strong for the basic olive oil dressing. The ravioli really needed a sauce that was equally rich and indulgent to balance out the flavors, so I decided to make an Alfredo type sauce for them. Typically I don't cook a lot with cream or make cream sauces, but after experimenting a little, I think this one came out just right; not too heavy and the basil adds a nice freshness. Next time I make this sauce I think I will toss it with some fettuccine and sauteed mushrooms or shrimp. Of course, I won't be making this sauce weekly, it is not exactly bathing suit season friendly!

This sauce makes enough for a pound of pasta. If you are using one of those 8 ounce fresh pasta packages, then just divide this recipe in half!

1 1/2 Cups Heavy Cream
2 Tablespoons Butter
1 Cup freshly grated Parmesan Reggiano cheese
4 Garlic cloves, minced
1 Shallot, minced
10 Fresh Basil leaves, chopped
1/8 Teaspoon white pepper*
1/4 Teaspoon Kosher salt

*White pepper adds a much more subtle flavor as a seasoning to cream based dishes and fish, such as salmon.

Melt butter in a medium/large saucepan over medium heat. Add minced garlic and shallots. Cook, until tender, about 4-5 minutes. Add cream, Parmesan, and basil, increase heat to high and bring to a slow boil, reducing the sauce, about 4 minutes. When sauce is at desired consistency reduce heat to medium and add white pepper and salt, cooking an additional 2 minutes. Serve over pasta! You will probably want to serve it with some garlic bread to mop up all the yummy sauce as well!

Tuesday, May 19, 2009

Summertime Stimulus Package: 2 Bargain Whites

* I did not take the above picture but I would have liked to *

I am really more of a red wine girl, never really liked whites, in fact, I was downright snobbish about it. When I went wine tasting I would skip the whites and go straight for the reds, either handing the whites off to my husband, or just bypassing them all together. When you think about this, how sad and just plain ridiculous is it that I missed out on all that free wine? Good thing I have become more open minded, and in the name of palette training, over the years I have really come to appreciate a decent white. I enjoy white wines that are crisp and smooth, bottles that are especially good on a warm day, or when you want a glass of wine but nothing heavy or too sweet. White wine is the perfect companion to an outdoor barbecue or a beach picnic and also makes an excellent mask for pretending that you are not really drinking before cocktail hour…ha ha….

Fetzer Pinot Grigio (2006) is from California and can be found for around $6.99 a bottle. This wine is crisp, with hints of apple and pear, but not in a pear juice Chardonnay kind of way. This wine pairs well with spicy foods such as Thai and also went well with strawberries!

In a previous post I mentioned that I had yet to try Colombia Crest Vineyard 10 White Wine (2007). Well now I have, and this wine is a fabulous find at about $5.99! a bottle. This wine is smooth, with hints of citrus and apple. The Vineyard 10 has great drinkability and doesn't need any food, just a comfy chair and a patio!

Saturday, May 16, 2009

"Take Me to a BBQ Salad": Lemon Penne with Tomatoes, Bell Pepper & Feta


Several years ago, I made a version of this pasta salad for a barbeque but I had since lost the recipe. With this weekend’s gorgeous weather I decided to try and recreate something similar to what I remembered. This salad turned out delicious and would be a great addition to any summertime picnic or get together, plus it keeps really well and makes for excellent leftovers! You also wouldn’t have to worry about it getting too warm, because there is no mayo involved. To elevate this pasta salad from a side dish to a meal, add some store bought rotisserie chicken. Let’s get real, during a hot summer day the last thing you probably feel like doing is turning on a hot oven.

Lemon Pasta Salad with Tomatoes, Red Pepper & Feta
Serves 4 as a meal, 8 as a side dish

For the dressing:
7 Tablespoons olive oil
2 Teaspoons finely grated lemon peel
3 Tablespoons whole grain mustard *I actually used whole grain mustard with garlic. If you don’t have whole grain mustard with garlic, then use 2 tablespoons whole grain mustard with 2 minced garlic cloves.
4 Tablespoons fresh lemon juice

For the Salad:
12 Ounces Penne pasta
2 Cups grape or cherry tomatoes halved
2 Red bell peppers, chopped
10 Ounces crumbled Feta cheese

Start a large pot of salted water to boil.

Whisk oil lemon juice, mustard, garlic, and lemon peel in a small bowl until emulsified. Season to taste with salt and pepper. Set aside.

Cook Penne pasta in boiling salted water until al dente, about 11 minutes. Drain pasta. In a colander, rinse pasta with cold water until cool to the touch. In a large bowl, toss pasta with tomatoes, bell pepper, and feta cheese. Pour dressing over and toss until well coated. Season to taste with salt and pepper.
* If you have it on hand, top with some chopped fresh thyme.
We might see a lot of rain during the other 3 seasons of the year, but the Portland summers can't be beat! Lovin' it!

Thursday, May 14, 2009

Side Dish Perk-Up: Green Beans with Lemon & Thyme


To tell you the truth, I have been in a weekday food rut. I blame this on the manic weather we have been having this May in the Northwest . Just when I get into my spring/early summer cooking groove a cold winds strikes up, the sky gets dark, and the rain starts pouring down, washing away my visions of dinner alfresco. The weekends have made it easier to be inspired, I have more time for one, and there always seems to be something going on or guests to cook for. Plus the local Farmers Markets to feed both literally and figuratively, my culinary soul. However it is mid-week and I have been struggling.....

Whenever I am experiencing a cooking block, I like to leaf through old food magazines or cookbooks hoping to get inspired. 99.9 % of the time it works. I found this recipe in a Bon Appetit from June 2007. This rendition of green beans helped make a boring meal of roasted chicken and red potatoes a little more jazzed up for Thursday night dinner. Sometimes it just takes a little twist on something to get you right back on track. For me that means thinking about what I am going to be making for dinner this weekend. I haven‘t quite decided yet, but the forecast says warm and sunny; so this much I know : dinner outside!
Green Beans with Lemon & Thyme
Serves 4

1 pound green beans (fresh & tender, skinny ones, Blue Lake if possible (Trader Joe‘s)
1 tablespoon butter
2 teaspoons chopped fresh thyme/lemon thyme
1 teaspoon finely grated lemon peel
Salt & pepper

Cook green beans in boiling salted water until crisp-tender, about 5 minutes. Drain. Rinse with cold water and pat dry. Melt butter in a large skillet over medium-high heat. Add thyme, lemon peel, and green beans. Season with salt and pepper. Toss until heated through, about 5 minutes.

Tuesday, May 12, 2009

Clam Dip Craving


I try hard not to eat junk food, much less feed my family junk food. I think I am pretty successful at keeping it out of the house, we don’t ever have packaged chips or sweets on hand, not even ice cream, and I finally got rid of the soda pop during Lent! I find it is far less tempting this way, out of sight, out of mind. (Don’t worry I am not about to go into some health food spiel right now!) My point is, despite these efforts to keep my family junk food-free (for obvious health reasons but also to try and set a positive eating example for my daughter) there are just those times, days, and weeks where you want to sit back and enjoy a good salty chip (Lays, Ruffles, Kettle, name your brand….) I finally caved to my chip craving this afternoon, and I made my favorite dip too. After all, everyone knows chips go better with dip! So tomorrow I will eat my veggies, but today I am eating chips……..

This clam dip is pure comfort food to me. When I was pregnant and dealing with morning sickness, clam dip and those little hostess chocolate donuts were the only thing I craved and wanted to eat. Weird and a little gross, I know. In college, I would make a big bowl of this anytime I was in the middle of exams or writing a big paper. I would eat it all week for breakfast, lunch and dinner, totally disgusting my poor roommate. (When you open the clams, the smell is less than appetizing, but once it is all mixed together, the smell fades away, promise!) The resulting dip is creamy, salty and super addictive. (My dad and I once chowed through a whole bowl of this one Thanksgiving day, it was just us two, so there was no one else around to bear witness to our gluttony!) I like to serve this dip alongside Reduced Fat Ruffles. Not sure how much lower in fat they actually are, but that label sure makes me feel better!

Clam Dip

1 lb lowfat sour cream or IMO substitute (If you want a light and airy dip, go with sour cream, if you want it thicker go with the IMO.)
1 6.5 ounce can minced clams, drained (reserve 1 tablespoon of the clam juice)
1 tablespoon clam juice (reserved from the canned clams)
1 tablespoon Worcestershire sauce
1 tablespoon fresh lemon juice
1/2 tablespoon garlic salt
1/8 teaspoon pepper
Potato Chips

In a medium bowl put sour cream, mix in clams, clam juice, Worcestershire, lemon juice, garlic salt, and pepper. Taste, and add more garlic salt or Worcestershire as necessary. Indulge a little!

Saturday, May 9, 2009

Busy Mom's Lemon Chicken


I was given this recipe several years ago by a very busy working mother. She was a professional and worked very long days but she always managed to put a nice hot meal on the table for her family. While I think she was a great mother, I don’t think there was anything extraordinary about that. Most moms I know or grew up with did the same. That is the wonderful thing about moms. They can take a simple recipe and with a little love, it becomes a tasty and comforting dinner time staple.
Happy Mother’s Day Mama’s!!

Lemon Chicken
Serves 4
4 boneless, skinless chicken breasts
2 lemons , 1 sliced , 1 grated and juiced
4 tablespoons brown sugar
1 ½ cups chicken broth
1 clove garlic, minced
2 tablespoons vegetable oil
Flour
Salt and Pepper
Preheat oven to 350 degrees.

Make 2 plates, one with the juice of 1 lemon and the other with a cup of flour mixed with ½ teaspoon salt.

Dip each piece of chicken 1st in the lemon juice and then dredge through flour, shaking off excess. Set aside. Heat 2 tablespoons oil in large frying pan over medium high heat. Brown chicken breasts 2 minutes on each side. Place chicken in 8 x 8 pan. (Grease if not using a glass pan!) Top chicken with the broth, rest of lemon juice, and minced garlic. Sprinkle chicken with lemon peel and brown sugar. Top with lemon slices and bake covered for 45 minutes at 350 degrees. Pour lemon sauce over rice and serve!